4th Of July 2016 x RECAP

2

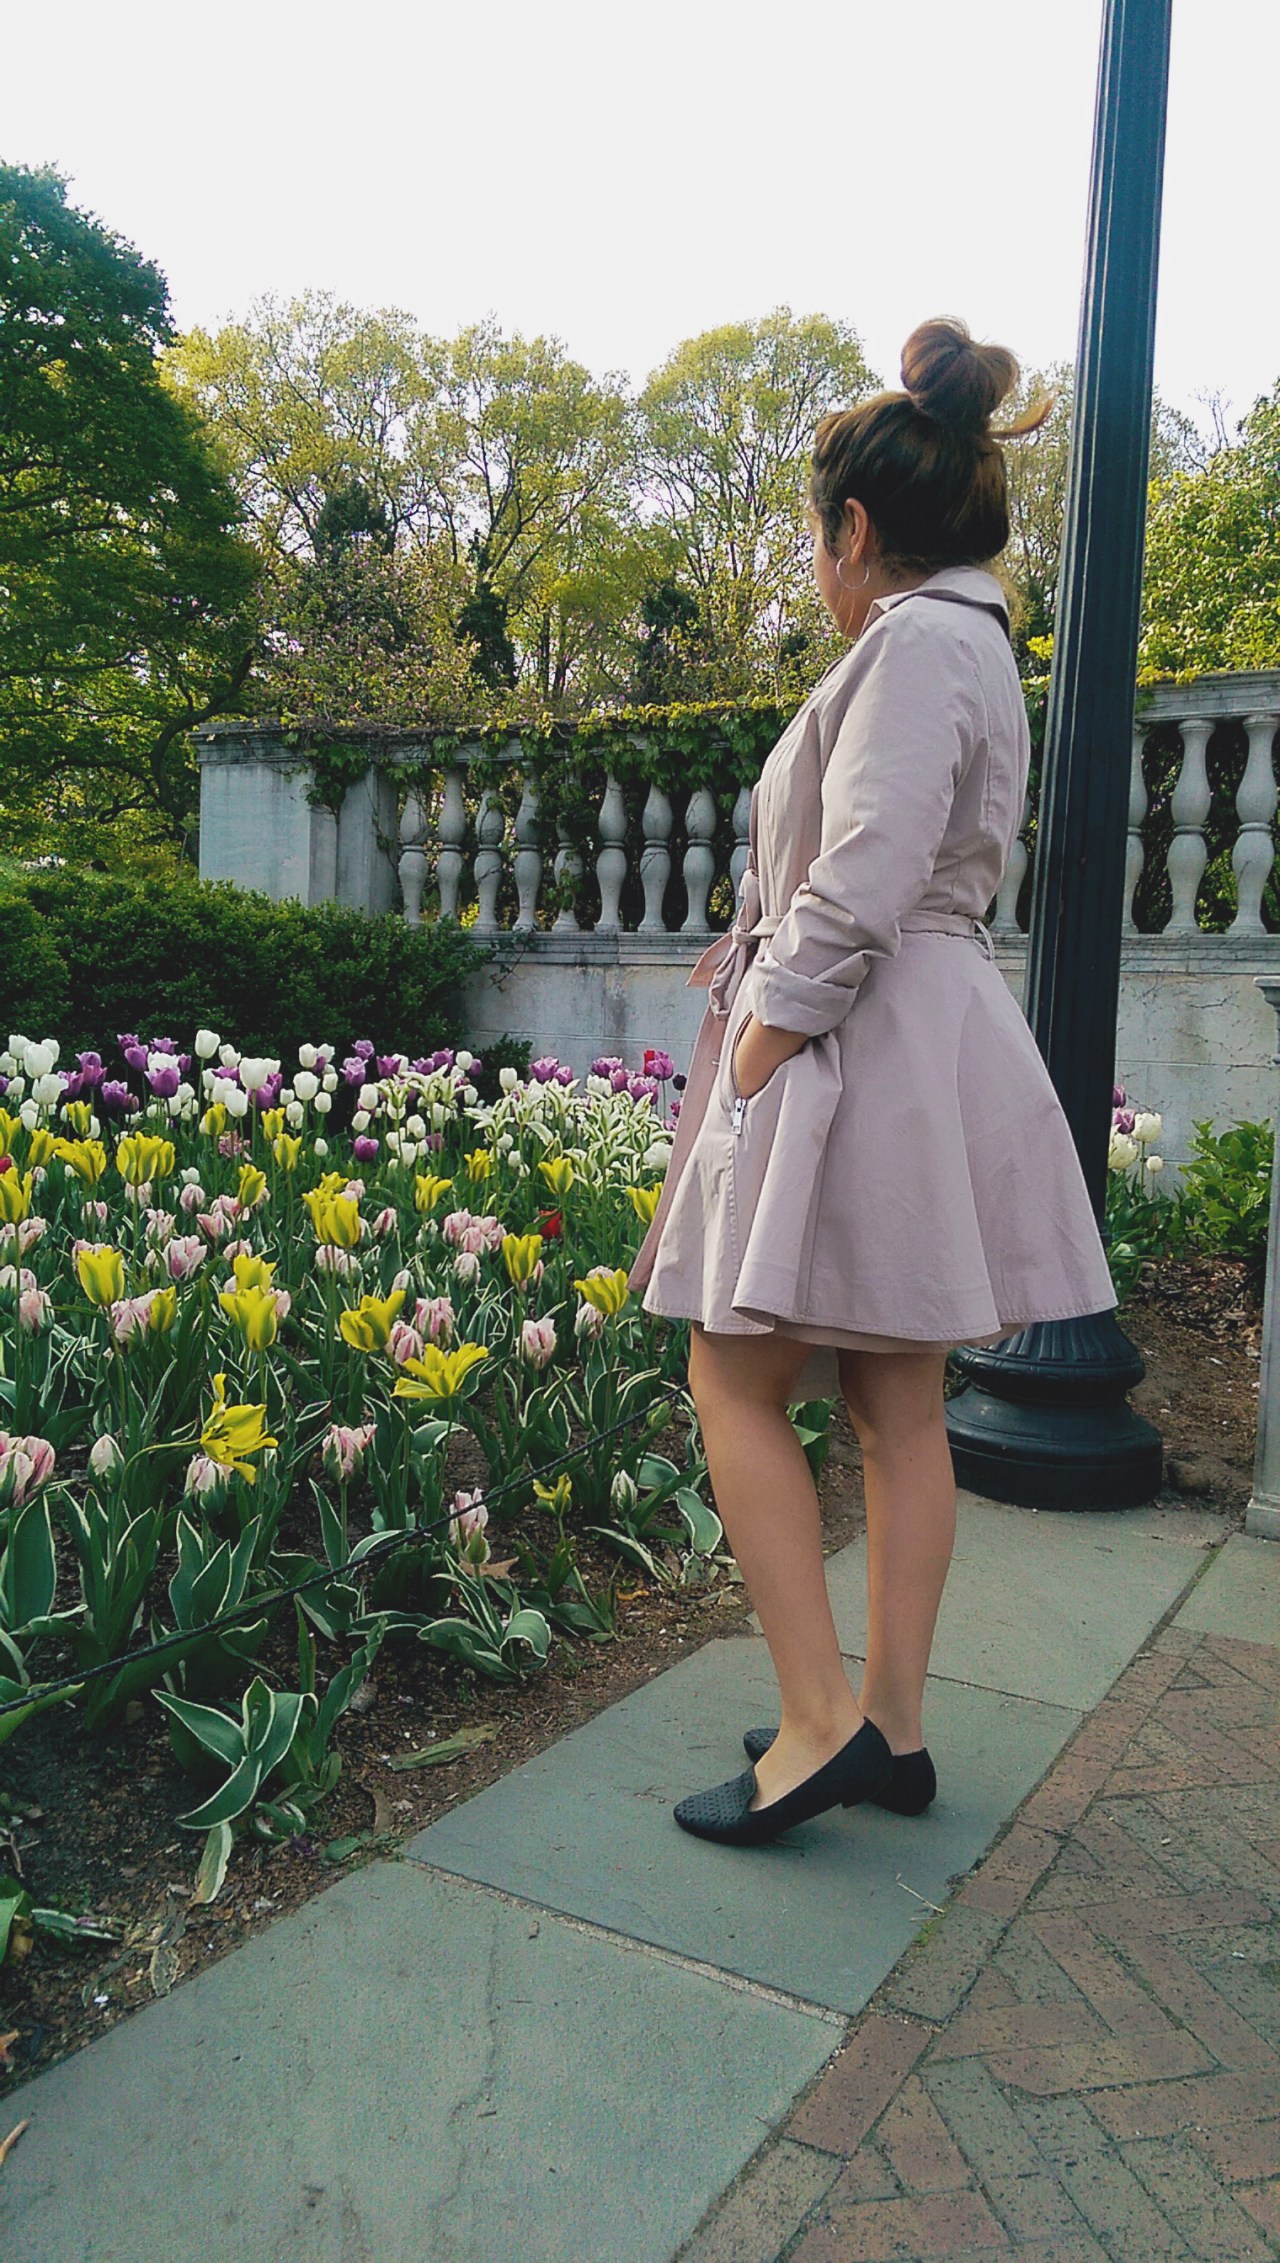
Bless the 3 day weekends! lol My 4th of July was spend with a lot of family quality time along with great cooking, smokey bbq, some fireworks but sadly a lot of rain towards the end. Countless number of people around the neighborhood were lighting their own firework rockets. The #ootd for the nations celebration of independence was something airy & comfortable, just to feel the slight breeze that managed to travel through even with the hot sun steaming.

3i

IMG_0107

IMG_0082

A funny moment that occurred during the middle of our 4th of July bbq was when we almost lost our pet rabbit.

6i

(Found this beauty in a local thrift shop..) 

IMAG3866

IMG_0098

Most of my family attended the bbq & when I mean everyone, I’m also talking about our house pets, Chocolate the rabbit and Dardy our Shiht Zhu. Our rabbit is a short eared, solid black, mini rabbit. She’s always kept indoors but my father decided to give her a vacation by bringing her to the grassy areas of the backyard where we were having the bbq. When we looked at her, she seemed like she was in nirvana as the the sun was shinning on her. But for her protection, we kept the top of her cage on her so they’ll be no risk of losing her.

5i

4i

Without realizing, the door to Chocolates cage opened because my youngest brother had fallen on top of it! No one noticed that her cage popped open and when my dad went to check up on her, she was GONE! We were frantically looking for her all over the the backyard and we were worried that she had wondered off into our neighbors yard or worst, that the local owl took her for dinner! 😱

Eventually (20 minutes later) we found her grazing the grass under the family car. Leisurely, hopping from one patch to another. We all started laughing at the coincide that  at all of times we could have lost Chocolate, imagine it being on the 4th of July of 2016!

Thank you for reading & checking out my blog!

cardigans: Target & Forever 21, top: H&M, shorts: Forever 21, bag: Local Thrift store, sunglasses: unknown


Metallic Foil Stripe x Nails Update

IMG_9812

IMG_9817


IMG_9783

IMG_9804

IMG_9749

Before I decided to try this design, I wasn’t aware that the stripes are called nail foil and if your looking for the ultra thin ones, just add stripe to the end of that google search. Their not expensive but before I purchased it, I decided to experiment with supplies I already had available at home. To improvise, I used aluminum foil to cut into really thin stripes and for glue, I depended on the polish to get a little dry and tacky. The tackiness made it like glue which made the foil stripes stick with only a few layers of coating. Then lastly, sealed with a clear top coat…

These are the finished results! Enjoy and let me know what you think of this design!


4 Summer 16′ Trends

And here we go, lets start our summer engines to dive into the sunny, humid days ahead for the remaining two months. Winter wasn’t as brutal as winters a la past, but it feels amazing to know that the heavy layers are now tucked away until the fall.

For summer 2016, certain summer styles and trends are really exciting and refreshing to see amongst the buzz of the streets in city that never sleeps. The following are just some highlights of those trends starting from the runway and embodied in street style, that made an effortless transition to summer from spring.

Updated Classic: T-shirt Dress

For the ultimate lazy girl at heart, this look is bliss. Not only can you find an effortless oversized, long t-shirt in almost any store (aim for two sizes larger), but with some cool accessories its an effortlessly chic daytime look.

Sleeve Details

Off the shoulder (aka cold shoulder) look, brought into focus a hidden gem to the surface through showing exposing shoulders, the neckline and occasionally maybe a bit of décolletage. But for 2016, it seems to be not enough because the emphasis is aimed at the sleeves. They’ll range from wide and voluminous pieces that vaguely reference those from the 17th century’s.

Prairie Boho

“And so, this part cowboy, part angel was born.” -Ella Alexander, GlamourMag

This look ties in elements of femininity and workmanship with high necklines, low waistlines and ditzy floral patterns. The style embodies functionality, since the original prairie women led more of an active, free spirited, outdoorsy lifestyle. As your assembling your style, beware because it can potentially fall into fancy dressing or sickly sweet butterscotch, therefore balancing is key. By adding touches of edgier accessories for a modern look.

Patches & Pins

Street style has a new accessory that adds a little fun (a bit of nostalgia) to any piece of item that needs a bit of tune up. Although you can purchase already made pieces with patches or pins attached on them, sadly it takes away most of the fun of customizing your pieces. With so many choices available, the biggest challenge will be to stick to a theme, a particular size and the sense of direction to each patch or pin.

These are just some of my personal few but there are many more floating around. Thanks so much for reading through it and let me know if any of these are your personal favorites too!

Contour Palette & New Glasses!

Its been a while since my last blog post and I’m really not proud of that. But theres been a few changes in my life and the pivoting point was sometime towards the end of May. For example, I’m officially a college grad (after 4 stressful years, I thought I’d never see the day come).

IMG_9608

Most recently though, I got a new pair of glasses. I tried to familiarized myself with the types of frames that would suit my face shape before I stepped into the store. By the time I went into my local lenses store, I was so excited and overwhelmed by all the different options that I just attempted to try everything.. what can I say, I couldn’t help myself! red-glasses-

The ones shown in collage above are the new glasses. The frames are half red/magenta and half black.

Rectangular-glasses-

The ones in this collage are my old ones. Sometimes I would feel like an executive in these or a moody librarian… it just depended on the day lol.

#MOTD

So in honor of the new frames, I decided to also experiment with my everyday makeup. A makeup look that would be bold enough to pop! For the main focus, I contoured my face using the Wet n Wild Contouring Palette in Dulce De Leche (which soooooo happens to be done of my favorite deserts). As I was applying the contour and highlighter, I was very impressed by how easily I could blend the shades. Yet I wasn’t thrilled at how light the contour appeared on my face especially if your aim is to add drama using it!

456667f8-889e-4d6c-9e66-cd1087c1aeed_1.4df8b262d13e01955a1b1cbb5db82785

A dramatic wing, a few racing stripes and a small dot…


I enjoyed using the Contour Palette by Wet n Wild, it was a fun way to discover my angles and what works vs. what didn’t. Would I repurchase the kit again? Probably not.

IMG_9622

Thank you so much for reading along and checking out the post! Please let me know what you think of the glasses and if you enjoyed this post. Have a blessed day ✌️


Cynthia Rowley x Summer Swimsuits

swimsuit-desire.jpg


As a little girl, one piece swimsuits were the staple to my wardrobe during the summer session. They ranged from tropical floral prints to bold salmon colors and ruffles along the waist. For the summer season, RTW Cynthia Rowley blends the functionality of a sporty wetsuit with a cute bikini bottom for the inner surfer gal in everyone. Her passion for designing the wetsuits comes from her own love of surfing. These are just a few that I picked out from her website that look so delicious! The neoprene helps maintain the shape, which is an awesome characteristic of neoprene. Rowleys buy now wetsuit capsule collection comes in ten different patterned fabrics from color blocking to florals to minimals! The effortlessness of style selections within the varying looks are killer!

Now, if I only find a Australian like beach in NYC…

original story: http://www.vogue.com/13439015/cynthia-rowley-australian-fashion-week/?mbid=nl_052416_Daily_VR&CNDID=22233654&spMailingID=12976871&spUserID=MTE0MDEyODExMzQ1S0&spJobID=743680861&spReportId=NzQzNjgwODYxS0

Chunky Platforms

IMG_9503

For the longest time I’ve wanted a pair of platform booties! I had searched countless places and sites to find the right fit, the right size platform and the right texture. A timeless investment that’ll add to other pieces in my closet and tie some of the looks together. It comes with a bold silver zipper in the back of the ankle so the front view is clean and minimal. I kept the rest of the look minimal so the emphasis and focus would go directly to the new shoes. A baggy sweater for those rainy days, and lets be honest, the baggier the better lol.

Platforms: ASOS  Dress: Forever 21  Sweater: Champion  Choker: custom

IMG_9479

IMG_9470

IMG_9482

Frame-24-05-2016-07-14-36

IMG_9485


90’s Paint Splatter: Nails Update

IMAG3815-01

IMAG3820-01

boulders_jawbreakers_1

Did you notice? maybe? That the middle of the 2010’s brought out everyones inner 90s kid. Suddenly 90s throwbacks were blissful reminders of the simpler moments during our youth. People expressed their homage to that decade through their fashion and beauty choices. If this decades version of the 90’s sticks around for the remaining of the of 2010’s, only time will tell, but it’ll be a hell of an interesting sight to see how the styles evolve and grow with the different tastes. Heres my ode to 90’s trend, a jawbreaker paint splatter style nails. Using some warm water, hair spray, olive oil cooking spray, and a piece of plastic, I managed to get the style down but it took some patience.

Enjoy!

Metallic Green Liner #MOTD

IMG_9037

IMG_9108

greenliner5

greenliner3

greenliner2

IMG_9093

IMG_9095

greenliner9

greenliner12

greenliner6

greenliner1

greenliner

greenliner11

greenliner10

greenliner8

IMG_9088

Foundation:

I started with a clean face and then used the Aveeno Daily Moisturizer to give my skin some life. My favorite part of the moisturizer is the scent because its refreshing and airy yet it helps with the prevention of breakouts! Then I continued with my color correction and concealer to smooth out uneven tones. For the first time, I also played with the NYC Bronze Face Powder that my mother often uses. I was pleasantly surprised to see how much of a difference it made as a last touch to the foundation routine. It adds a bit of color to my complexion especially right after I finish applying concealer & foundation.

Lips:

Just a tab of tinted moisturizer and they were done 👍

Eyes:

The toughest part was getting the new eyelashes to get the shape of my eyes. Whenever you get a pair of faux lashes, the first thing before you wear them out is to break them in.. literally. It also helps to have a strong lash adhesive. Sadly, the one I’m currently using, the Revlon Precision Adhesive, works to a certain extent. I tend to apply the adhesive and then leave it for a few seconds to dry a little so it’ll become a bit sticky but what kept on happening was that the adhesive would dry almost immediately on the corners. When that’ll happen , it would take an extra 15 minutes longer just to make sure that the corners stayed put. So I’ll definitely be in the market for a new adhesive soon!

For the eyeshadows, I kept it very stubble & nude using the different shades shown in the Cast A Spell Beauty Book. For the next look, I’d probably add more eye shadow so it’ll be more noticeable.

The light green was the main touch. The light green liners from Milani Cosmetics and although it was a bit dry as I was reused it, the metallic color was still vibrant! I didnt have the heart to just throw it away cause I’d rather have it and not need it, then need it and not have it.

Anyways, I sincerely hope you enjoyed this look. Leave a comment to let me know how you would have used the green eyeliner differently and have a blessed day!

Brooklyn’s Garden x. Mothers Day

Garden1

IMAG3711 copy

garden3

garden2

garden4

garden5

garden7

garden6

garden8

garden9

garden10

garden11

IMAG3655


For this weekend adventure and mothers day, I visited the Brooklyn Botanical Gardens where they had a variety of plant species native to different regions of Asia. The colors were so vibrant and exciting to see that they almost felt hypnotizing lol. It was so pleasing to smell the aromatic lilac gardens because some had a great refreshing aroma that was so calming and refreshing. The more we lingered along the variety of species of lilacs the more I realized why many products in the perfume & cosmetics industry use hints of lilac.

There were many times where I was tempted to break a few of the flowers I was photographing and take them home.. but I didn’t, guilt got the best of me.

The outfit I wore was comfortable but the breeze made the weather feel chiller especially the later the day became (the temperature dropped like 20 degrees) and I only wished I had worn something warmer. I went with something casual that emphasized mostly the jacket. I’ve always wanted a jacket with flares towards the hips. I’ve never owned a trench coat before either so when i saw this coat… I knew that baby had to go home with me!

trench: Inc
dress: thrift store gold
shoes: forever 21
accessories: unsure

#MOTD w. Falsies

selfie 3

IMAG3472 copy

Wet n Wild Eyelashes 

selfie 2

wet n wild

Wet n Wild: Coverall Palette: I’ve been using the color correcting palette religiously, the colors even out my complexion and undertones, which is awesome. The only drawback is the white, which is meant for highlighting, its too shimmer… I like shimmer, but I was just expecting it to be matte.

eyebrow pencil (1)

selfie 4

foundation

selfie 1

The overall #Makeup Look!

Overall Review:

Lately I’ve been experimenting with false eyelashes & I recently bought these from Wet n Wild because I wanted some that looked fuller and longer… but be careful what you wish for. They looked great but they were a headache to put them on cause of how stiff they were and partly because I hadn’t handled wider & fuller lashes.

Color Correcting:

I started out with a clean face and after I applied sun screen and face moisturizer, I let it dry for a few seconds then started applying the color correcting. I’ve been getting in the habit of always using color correcting first because it evens out all the tones of my face. Especially my under circles, no matter how much sleep I get, they stay hallow.

Foundation:

Once I finished correcting, I began with concealer and then moved to apply foundation. The foundations I’ve been using, I got from as a gift through an internship with a beauty editor I did last fall. She had gone to a beauty convention in NYC and then brought back to me a bag full of makeup supplies and this foundation happen to fit my skin tone perfectly.

Eyelashes:

I then began to place the eyelashes on (which took longer then expected). The main culprit was my eyelash adhesive, from L’OREAL, I would let it dry for a few seconds so it’ll be a little stick and easier to apply. But the adhesive kept on drying out to quickly on the edges so it wouldn’t stay down on my corners..

It was a fun look to experiment with, once it was all done, the finished look was really nice to see and to start the day with. Enjoy!